
Mooching
How to mooch for salmon in the Puget Sound and the Strait: cutting plug-cut herring, rigging the banana sinker, and setting the hook on a soft bite.
How to mooch for salmon in Puget Sound and the Strait of Juan de Fuca: cutting plug-cut herring, rigging the banana sinker and responding to a soft bite.
Mooching is boat fishing with a weighted herring that spins as you lower and retrieve it. You usually drift with the motor off, hold the rod and feel for a salmon taking the bait. A small outboard can also help control the drift.
The bait is often a plug-cut herring: a herring with its head cut off at two angles so it spins. A banana sinker, a curved fishing weight, takes it down. The rig is simple. The practice comes in making the bait roll, controlling its descent and keeping contact through a soft bite.
Mooching began in Seattle in winter, about a century ago. Its birthplace was Elliott Bay in Marine Area 10 (Seattle/Bremerton). See Washington Marine Areas Explained below for how these fishing zones work.
What It Is and When It Beats Other Methods
A mooching rig puts a banana sinker between your main line and a leader, the line between the sinker and the hooks. The herring hangs behind the weight and spins as it rises and falls. You lower it toward baitfish or salmon shown on the sonar, the fish finder's underwater display.
You can work through the water column or stay at a depth where fish appear. Intermittent reeling and pauses give the bait a changing path. Boat motion can also work the herring while you hold a depth.
Why It Works
Mooching keeps a moving bait close to a known concentration of fish. WDFW places it among boat drift methods, which work best where salmon are concentrated. Instead of searching a wide area, you make controlled passes through water that already shows bait or fish.
The herring's double-angle cut gives it a spinning action. That action matters on both the descent and retrieve. Check the bait beside the boat before trusting a long drop.
Mooching is useful when:
- You have found bait and salmon. The fish finder gives you a depth to work.
- Fish occupy a small area. Drift fishing suits concentrated salmon.
- You want direct contact. The simple gear lets you feel the bite and hookup.
- You want to work near the bottom. Winter blackmouth, resident Chinook, are generally close to it.
Trolling becomes more useful when salmon are spread over a large area. Jigging is another drift method, using a weighted metal lure moved with the rod. Choose the method that fits what the fish finder shows rather than staying with an empty drift.
Drift Mooching or Motor Mooching
Drift mooching means working the herring from a drifting boat, usually without the motor running. The motor can still slow or speed the drift when needed. Quiet fishing and the feel of the bait are part of its appeal.
Motor mooching means slowly trolling the same banana sinker and herring rig. Going into gear lifts the bait; returning to neutral lets it fall. This covers more water while keeping the basic presentation familiar.
WDFW describes slow motor mooching for Chinook near kelp or structure, under 2 mph and close to the bottom. Its coho approach is faster, at 2–4 mph near the surface along rips. A tide rip is a current boundary that can concentrate plankton and baitfish.
Treat those as different presentations. Check the spin at the speed you intend to fish. A bait that rolls cleanly beside a drifting boat may need adjustment when pulled faster.
Brushing Up: Choose between drifting and motor mooching by the spread of the bait. Concentrated marks (fish shown on the sonar or fish finder screen) support a focused drift; sparse bait schools favor a method that covers ground.
Target Species and Where in Washington
Chinook and coho are the main focus. Blackmouth are resident Chinook that stay in the Salish Sea and are fished in winter and early spring. Resident coho also stay in the Salish Sea.
Pinks occur in odd-numbered years and are often found in open water at 40–80 ft. They're in the depth picture, but this page doesn't cover mooching for them.
See Salmon for species background.
Where It Works in Washington
These are the places this page covers:
- Marine Area 10 (Seattle/Bremerton): Elliott Bay is where mooching began.
- Marine Area 9 (Admiralty Inlet): WDFW names Point No Point, Possession Bar and Mid-Channel Bank for salmon. Anglers mooch and jig at Point No Point and Mid-Channel Bank.
- Marine Area 13 (South Puget Sound): WDFW names Tacoma Narrows and Fox Island for resident coho.
- Marine Area 5 (Sekiu/Pillar Point): Blackmouth prospects depend on weather and whether baitfish are present.
Mooching is a boat method. A fish finder helps you locate bait and choose the depth of the presentation. A named place doesn't mean it's open. Check WDFW before you go.
Where Salmon Sit, by Depth

- 1. Coho: often the top 50 ft
- 2. Chinook in open water: start at 40–80 ft
- 3. Chinook at first light near kelp: 20–120 ft of water
- 4. Blackmouth: within 10 ft of the bottom in 60–200 ft
- 5. Pinks: often 40–80 ft
Marine Area by Marine Area
Washington Marine Areas Explained
Marine Areas are WDFW's numbered saltwater fishing zones. Seasons and rules are set by area and can change in season. Find yours on WDFW's Marine Areas page, then check the water you plan to fish.
| Marine Area | Where It Is |
|---|---|
| Marine Area 5 (Sekiu/Pillar Point) | Sekiu/Pillar Point. |
| Marine Area 9 (Admiralty Inlet) | Admiralty Inlet. |
| Marine Area 10 (Seattle/Bremerton) | Seattle/Bremerton. |
| Marine Area 13 (South Puget Sound) | South Puget Sound. |
Mooching Spots by Marine Area

- 1. Sekiu, Marine Area 5 (Sekiu/Pillar Point)
- 2. Point No Point, Marine Area 9 (Admiralty Inlet)
- 3. Possession Bar, Marine Area 9 (Admiralty Inlet)
- 4. Mid-Channel Bank, Marine Area 9 (Admiralty Inlet)
- 5. Elliott Bay, Marine Area 10 (Seattle/Bremerton)
- 6. Tacoma Narrows, Marine Area 13 (South Puget Sound)
- 7. Fox Island, Marine Area 13 (South Puget Sound)
Marine Area boundaries: Washington Department of Fish and Wildlife (WDFW).
Simplified from WDFW data. Not the legal boundary; WAC 220-311-010 and WDFW rules govern. Not endorsed by WDFW.
Marine Area boundaries: Washington Department of Fish and Wildlife (WDFW)
Simplified from WDFW data. Not the legal boundary; WAC 220-311-010 and WDFW rules govern. Not endorsed by WDFW.
Elliott Bay
In Marine Area 10 (Seattle/Bremerton), Elliott Bay is the birthplace of mooching. The method hasn't changed much: a spinning herring, simple tackle and close attention to the line.
Start with the fish finder, not the history. Locate bait and salmon before choosing the depth of a drift. Marks away from the bottom deserve attention too. Don't assume the deepest presentation is always the useful one.
For Chinook, light changes the depth picture. For blackmouth, the general starting point is near the bottom unless suspended bait suggests otherwise. Choose the presentation from what is beneath the boat.
Check WDFW's Marine Area 10 rules page.
Rules change by Marine Area and in season. Check the current WDFW sport fishing regulations and emergency rules before every trip.
Point No Point, Possession Bar and Mid-Channel Bank
In Marine Area 9 (Admiralty Inlet), WDFW names Point No Point, Possession Bar and Mid-Channel Bank among its salmon locations. Mid-Channel Bank lies between Point Wilson and Marrowstone Point. Point Wilson is at one end of the bank.
Anglers mooch and jig at Point No Point and Mid-Channel Bank. Use those names to narrow your planning, then let bait and marks determine the drift. A named bank or point is a large search area compared with a bait school.
The general pattern to inspect is a steep drop-off where current meets a point. Such water can gather herring and sand lance, drawing salmon and birds. Confirm the bait on sonar before committing to repeated passes.
Check WDFW's Marine Area 9 rules page.
Rules change by Marine Area and in season. Check the current WDFW sport fishing regulations and emergency rules before every trip.
Tacoma Narrows and Fox Island
In Marine Area 13 (South Puget Sound), Tacoma Narrows and Fox Island are named waters for resident coho. Look for bait and current boundaries rather than treating the whole passage or island edge as equal water.
Coho often occupy the upper water column, while rips can concentrate their food. Blackmouth can also use shallower water where tidal currents gather baitfish. The useful depth comes from the bait and marks, not simply the bottom beneath the boat.
Check WDFW's Marine Area 13 rules page.
Rules change by Marine Area and in season. Check the current WDFW sport fishing regulations and emergency rules before every trip.
Sekiu
In Marine Area 5 (Sekiu/Pillar Point), WDFW lists winter and early-spring fishing for blackmouth. It depends on weather and the presence of herring and sand lance. Conditions can wax and wane with the bait. A known spot is a place to look, not proof that fish are under you.
WDFW lists launches at the Sekiu and Clallam Bay marinas and a small launch at Pillar Point Recreation Area. Check your launch before you plan the rest of the trip.
Once afloat, locate bait and marks before choosing a drift. The general blackmouth pattern favors water close to the bottom, but suspended bait can change that picture. Keep weather and bait observations together when deciding whether to continue.
Check WDFW's Marine Area 5 rules page.
Rules change by Marine Area and in season. Check the current WDFW sport fishing regulations and emergency rules before every trip.
Seasons and Conditions
Best Times, Not Regulations. Blackmouth are fished in winter and early spring. Resident coho are a winter and spring fish in Marine Area 13 (South Puget Sound) and an early-summer fish in Marine Area 10 (Seattle/Bremerton), when rules allow. Chinook follow light and bait; see By Species.
These are fishing patterns, not openings. In-season changes are common, so have a backup plan.
Check NOAA Tides & Currents for tide predictions and the NWS Seattle forecast office for the marine forecast. Compare the predictions with the current and drift you actually see.
Reading the Water: Tide, Light and Bait
Tide shapes both the plan and boat control. Salmon feeding follows the tide more than the clock, so plan around it and fish the tide change. No single window works everywhere.
Watch how the boat moves relative to the bait. Fast current may call for backing into it with the motor. Slow current may call for moving ahead in spurts. Wind or strong current can also call for motor control and more lead.
Light helps explain depth changes. Chinook often cruise closer to shore near kelp at dawn and dusk, then move deeper as sunlight brightens. In Elliott Bay, WDFW describes early morning and just before sunset as useful Chinook periods. Start with that pattern, then check the sonar.
Bait gives those clues a location. Rips concentrate plankton, which draws baitfish and then coho. A point with a steep drop-off can gather herring and sand lance where the tide meets it. Blackmouth may use shallower water where tidal currents collect bait.
A surface sign is worth checking, but it doesn't tell you the full depth picture. Sonar can show bait and marks at several depths, including away from the bottom. Work the depth where you see bait or fish before you go deeper.
Brushing Up: Record the bait depth alongside tide and light. A note saying "fish near the bottom" teaches less than a note showing where the bait was held.
Rods, Reels, Line and Leader
A useful mooching rod has a soft tip and enough backbone to handle the rig. Moderate action lets the rod bend more gradually than a fast-action rod. Lengths run 8½–10½ ft: WDFW suggests 8½–9 ft, and maker mooching rods run to 10'6".
A level-wind is a reel guide that moves across the spool to lay line evenly. A direct-drive reel has a handle that turns with the spool. WDFW favors direct drive for lowering under light thumb pressure, but a standard level-wind also works. A line counter displays how much line has left the reel.
Mono means monofilament, a single strand of fishing line. Braid is line woven from fibers. Mono is the usual pick for mooching. It tangles less, it's easier to untangle and it helps you feel the bite.
| Gear | Starting Setup | Range or Note | Why It Helps |
|---|---|---|---|
| Rod | Moderate action with a soft tip | WDFW: 8½–9 ft; maker mooching rods run to 10'6". | Helps show and feel a light bite. |
| Reel | Level-wind or line-counter reel | WDFW: holds 100–200 yards; direct drive works best if you find one. | Controls descent and helps repeat depth. |
| Main Line | 15 or 20 lb mono | WDFW's range is 10–20 lb. | Mono tangles less and helps you feel the bite. |
| Leader | About 4–5 ft, no heavier than the main line | Pair 15 lb main with a 12–15 lb leader, or 20 lb main with a 15 lb leader. | Keeps the leader as the intended weaker connection. |
| Sinker | Several banana-sinker weights | From a couple of ounces in slow water to 8 oz in strong current; motor-mooching examples use 1–2 oz shallow and 3–8 oz deep. | Lets you adjust line angle. |
| Hooks | Match hooks to the herring | Green-label example: 4/0 lead hook and 3/0 trailing hook. | Lets the bait retain its intended spin. |
| Herring | Firm bait with intact scales | Green label is about 5–6 in; label sizes vary by brand, so check the package. | Sound bait is easier to prepare and keep fishing. |
Fluorocarbon is leader material that is harder for fish to see. It's an option rather than a reason to increase leader strength. Keep the leader at or below the main-line test.
Starter Kit vs Upgrade Path
Starter Kit
- Rod: Choose a generic moderate mooching rod or the Shimano Compre BC Mooching. Its medium model is 10'6" and rated for 12–20 lb mono and 1–4 oz. Use that model only within those ratings.
- Reel: The Okuma Magda Pro DXT has a mechanical line counter in feet and a level-wind guide. The maker sells it as a trolling reel; its counter is useful here for repeating line out.
- Main line: Izorline XXX Hi-Vis Yellow is sold in 8–20 lb tests. Choose 15 or 20 lb for the example pairings on this page.
- Leader: Choose 12–15 lb leader, no heavier than the main line. Seaguar STS Trout & Steelhead includes those tests within its 4–17 lb range.
- Hooks: Gamakatsu Octopus includes the sizes used in the herring examples. Match the hook to the bait rather than choosing by fish size alone.
- Weights: Bullet Weights Spin Sinkers provide the banana shape and swiveling connections. Carry several weights and match them to the rod's rating.
- Bait preparation: Pro-Cure Brine 'N Bite toughens bait and tightens scales. Add a generic miter-box cutter and sharp knife for preparing the plug cut.
- Bait: Buy sound herring locally and ask about current bait availability. Inspect scales, freezer damage and blood beneath the wrap.
Upgrade Path
Improve control before adding more tackle. Learn to lower without slack, repeat depth and adjust the boat while watching the line.
A rod suited to heavier sinkers can extend your options when the current calls for more lead. Keep the complete rig within its ratings. A reel with smooth drag, the mechanism that releases line under pressure, helps you maintain tension during a fight.
Carry spare leaders and a wider selection of sinker weights. Keep every spare leader at or below the main-line test. More equipment is useful only when you know which problem it solves.
Terminal Tackle and Rigging, Step by Step
Lay out the rig before preparing the bait. A snap swivel is a swivel with a wire clip. It lets you change the sinker without rebuilding the whole connection.
A snell is a knot that ties the leader along the hook shank. A prepared mooching leader can simplify the first setup. Check the line test and hook arrangement before attaching it. For knot steps, see Drift Fishing's rigging section.
Mooching Rig, Main Line to Herring

- 1. Main line, 15 or 20 lb mono
- 2. Snap swivel
- 3. Banana sinker, swivel at each end
- 4. Leader, about 4–5 ft: 12–15 lb under a 15 lb main line, or 15 lb under 20 lb; never heavier than the main line
- 5. Lead hook (nearest the rod) and trailing hook
- 6. Plug-cut herring
How It Works, Step by Step
- Choose the weight. Carry several banana sinkers so you can adjust for current and line angle. Keep the chosen weight within the rod's rating.
- Connect the main line. Use a quality ball-bearing snap swivel to clip on the sinker. Follow the line maker's knot guidance and pull-test the connection.
- Attach the leader. Use about 4–5 ft between the sinker and hooks. With 15 lb main line, choose a 12–15 lb leader. With 20 lb main line, use a 15 lb leader.
- Match hooks to bait. For green-label herring, use a 4/0 lead hook nearest the rod and a 3/0 trailing hook. Check WDFW hook rules before rigging.
- Prepare sound herring. Look for intact scales and no freezer burn or blood under the wrap. Brine whole herring overnight, then cut each bait as needed.
- Make the plug cut. Remove the head with a bevel front to back and side to side. A bevel is a slanted cut. A generic miter-box cutter helps make those angles repeatable.
- Hook and test it. Pass the upper hook through the body cavity and out the top. Check for a quick, tight spin beside the boat before lowering.
Preparing the Herring
Brine is a salty soaking liquid used to firm bait. Brine herring whole and cut each one as you fish. Keep the uncut bait protected while you prepare the next offering.
Pro-Cure Brine 'N Bite is a bait-preparation option that toughens bait and tightens scales. Follow its directions rather than combining an improvised recipe with the product.
The cut works in two directions. There's no exact angle to chase. Make a clean double bevel, rig the bait and let the water test tell you whether it works.
The Plug Cut, Two Bevels
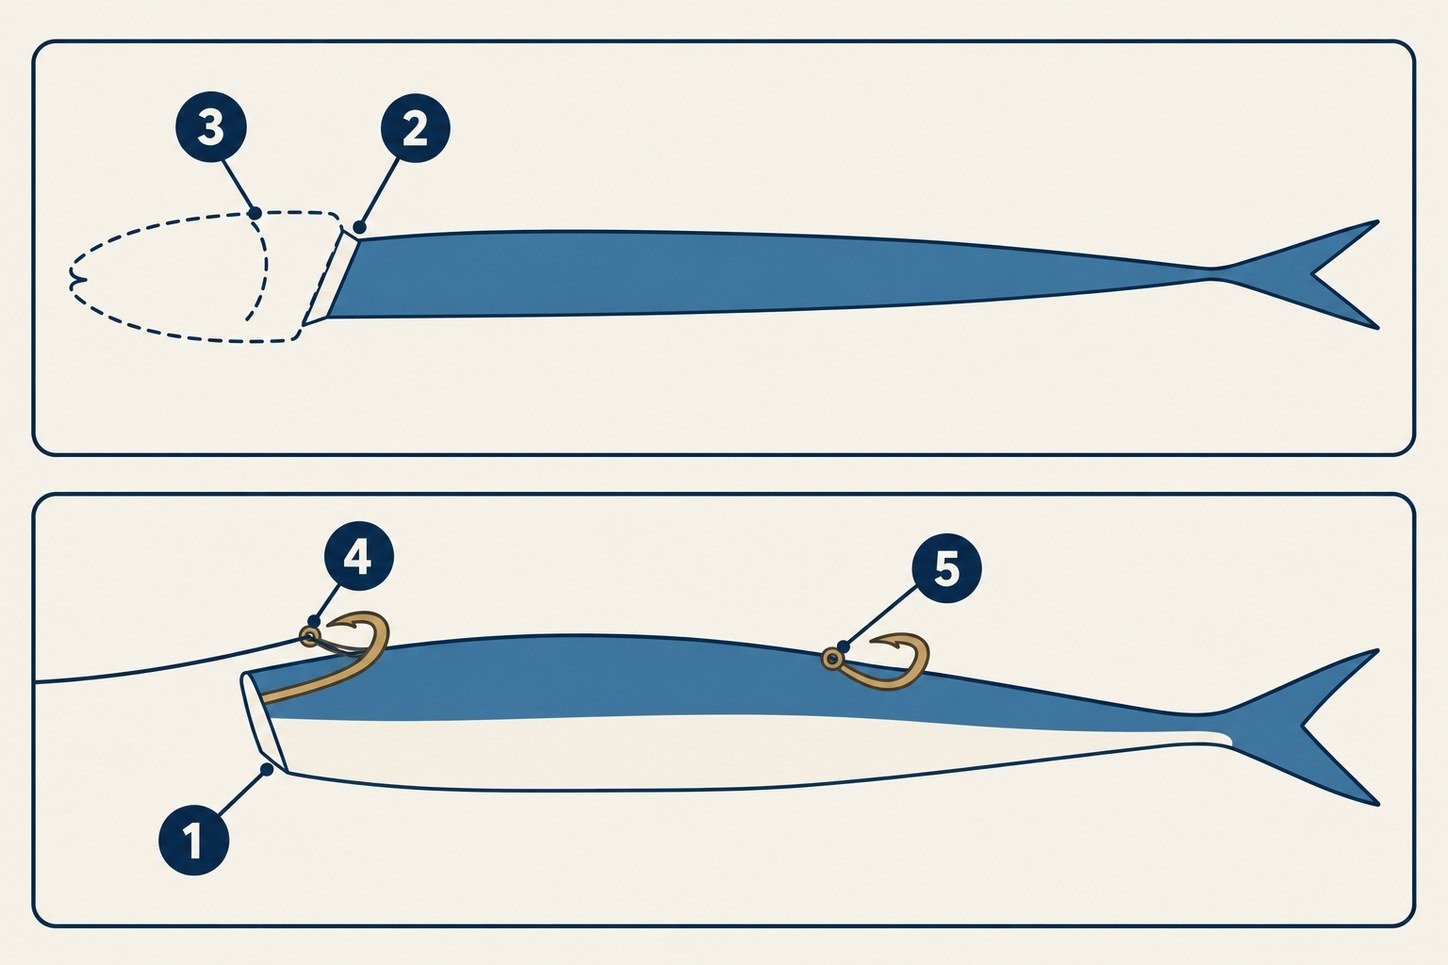
- 1. Bevel front to back
- 2. Bevel side to side
- 3. Head off at a double bevel
- 4. Lead hook through the body cavity and out the top
- 5. Trailing hook
Test the spin before every drop.
Matching Hooks to Herring
Herring label means the package's color code for bait size. Green label is about 5–6 in in WDFW's example. Label sizes vary by brand; check the package.
The smaller red-label hook range is 2/0–3/0. The larger blue-label range is 4/0–5/0.
Gamakatsu Octopus hooks include these sizes within the maker's range. Choose the size that fits the bait and allows a clean roll.
Herring and Hook Size Card
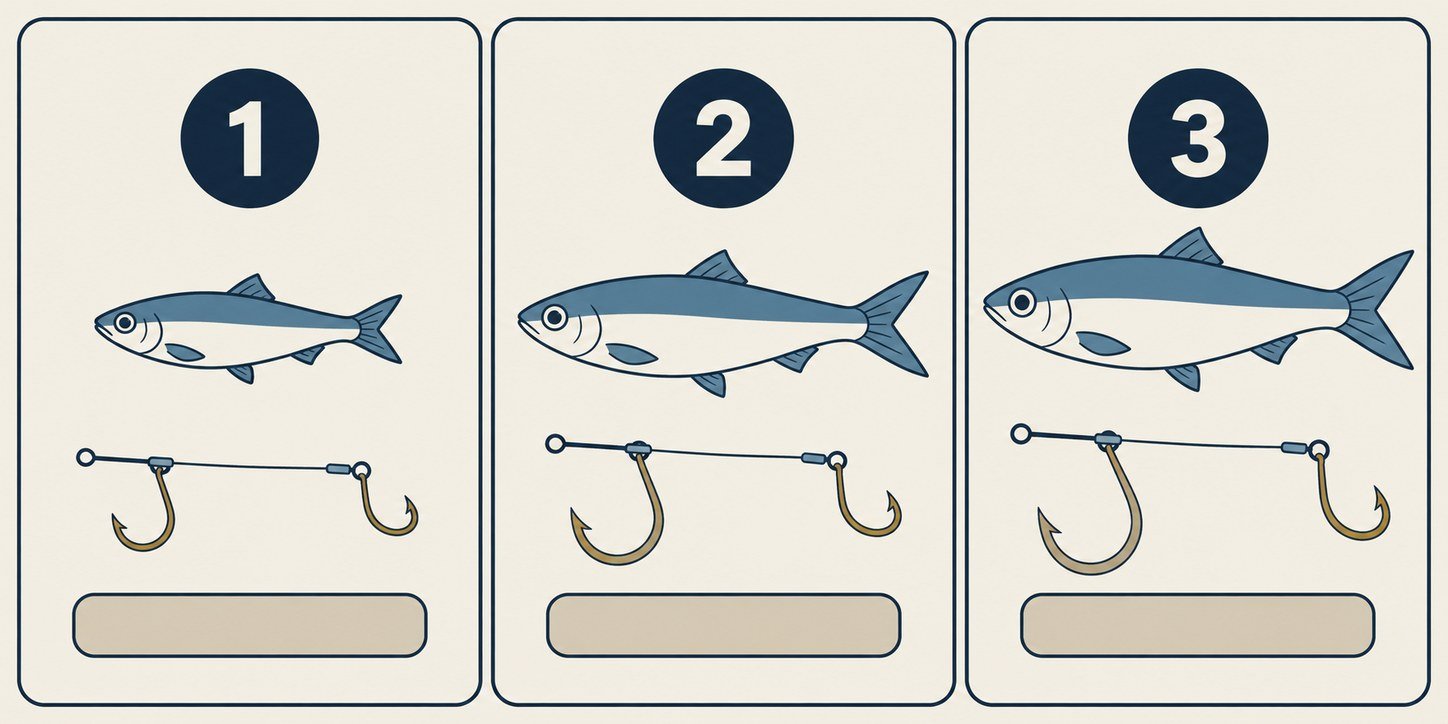
- 1. Smaller (red label): 2/0–3/0
- 2. Green label, about 5–6 in: 4/0 lead and 3/0 trailing
- 3. Larger (blue label): 4/0–5/0
Label sizes vary by brand; check the package.
Brushing Up: Inspect the whole bait after a poor spin test. A rough cut, awkward hook placement or damaged body can leave you adjusting the wrong part.
By Species
Chinook
For Chinook in open water, WDFW gives 40–80 ft as a starting depth. Near kelp at dawn and dusk, Chinook may cruise in 20–120 ft of water. They tend to move deeper as the sun brightens.
WDFW names blue- or purple-pack herring for Chinook. Match the hooks to the actual bait and test its spin. Keep the leader at or below the main-line test rather than increasing it just because the target is Chinook.
Use the range to start. Once the sonar shows bait and fish, fish that depth.
Blackmouth
Blackmouth are generally within 10 ft of the bottom in 60–200 ft of water. Lower to the bottom, then work up with short bursts of reeling and pauses.
Bottom-oriented doesn't mean bottom-only. Blackmouth sometimes suspend with bait, and tidal currents can gather bait in shallower water. Check those marks before assuming the sinker needs to reach the deepest part of the drift.
Keep enough contact to recognize a change. Watch line angle as well as depth, especially when working close to the bottom.
Coho
Coho often occupy the top 50 ft and gather around rips. WDFW suggests green-pack herring or smaller and a faster-moving bait. Bright sun can push them deeper.
Use smaller hooks when the herring calls for them. A larger hook doesn't improve a bait that has lost its roll.
Motor mooching offers a way to cover a rip with a faster presentation. Keep checking bait action as speed changes. A faster retrieve is a controlled adjustment, not a reason to stop watching the line.
Pinks
Washington pink runs occur in odd-numbered years. Pinks often school in open water at 40–80 ft and are not necessarily tied to rips.
You may meet them while mooching for other salmon. This page has no separate pink rig.
Technique, Step by Step
How It Works, Step by Step
- Find bait and marks. Use the sonar to locate baitfish and salmon.
- Set up the drift. Position the boat so its drift carries you over those marks. Reposition when the pass no longer covers them.
- Check the spin. Pull the herring through the water beside the boat before the first drop. Look for a quick, tight roll.
- Lower with control. Feed line steadily while keeping light contact with the spool. Aim for about a 45-degree line angle.
- Work the useful depth. Follow the bait and marks or use the whole-column pattern below.
- Retrieve and inspect. Keep the herring moving as you reel. Replace damaged bait and reset the drift when needed.
Lowering Without Tangles
With direct drive, let go of the handle and keep your thumb lightly on the spool. With another suitable reel, control the spool through its release system. The goal is steady descent with contact.
Dropping straight down too fast can let the sinker fall onto the bait and wrap the leader around the main line. A short cast can place the bait beyond the sinker before you feed line steadily. Keep that motion gentle so the bait doesn't slap the water and tear off.
Check the spin before lowering, not after a long empty pass. Then watch the line angle during descent. Near-vertical line increases the chance of a wrapped leader.
Holding the Line Angle
Line angle is the angle of the main line between the rod tip and the water. WDFW's target is about 45 degrees. Change sinker weight or use the motor to maintain it.
In fast current, back into it with the motor. In slow current, move forward in spurts. If the angle changes, fix the setup before you send out more line.
Use pulls, lengths of line drawn from the reel to the first rod guide, to repeat line out. A line counter can do the same job in feet. Neither removes the need to watch angle. Line leaving the reel isn't automatically the bait's vertical depth.
Line Angle, Side View
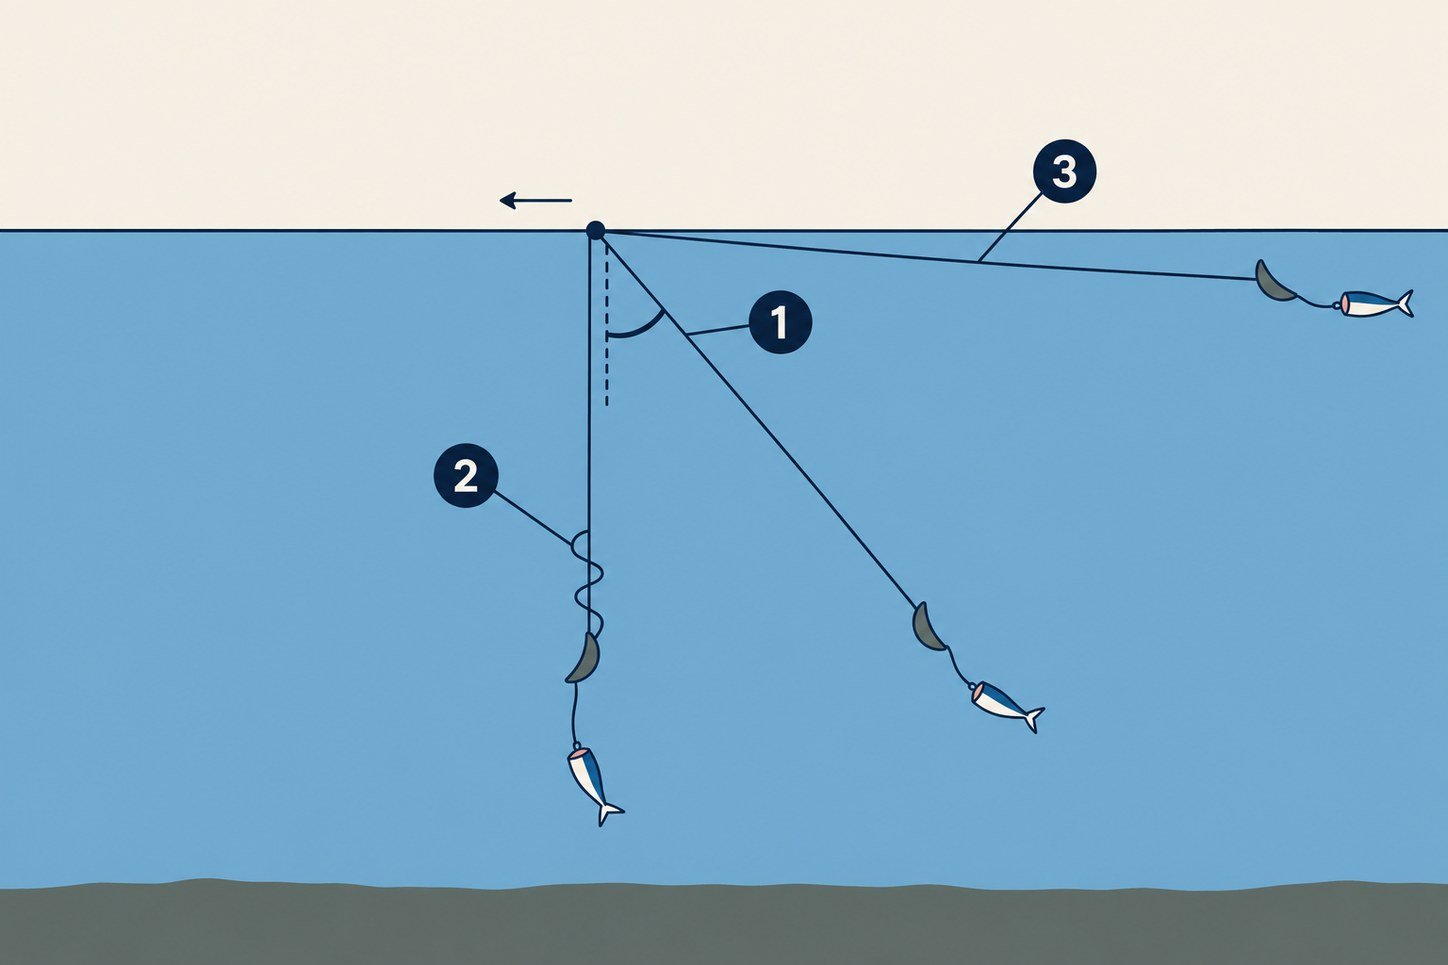
- 1. About 45 degrees: the target
- 2. Near vertical: can wrap the leader
- 3. Almost flat
Fast tide: heavier sinker or back into current.
Slow tide: lighter sinker or move forward in spurts.
Working the Depth
WDFW describes a stair-step approach: lower 10 ft, reel up 3–4 ft and repeat toward the bottom. Then begin again or work back upward. This searches the water column with repeated changes of direction.
The other approach holds a depth where fish appear. Raise and lower the bait there or let waves and boat motion work it. Choose this when the marks give you a clear reason to stay.
Send the bait down just fast enough to spin. Keep paying attention during the retrieve because a salmon may follow toward the surface.
Two Ways to Work the Depth
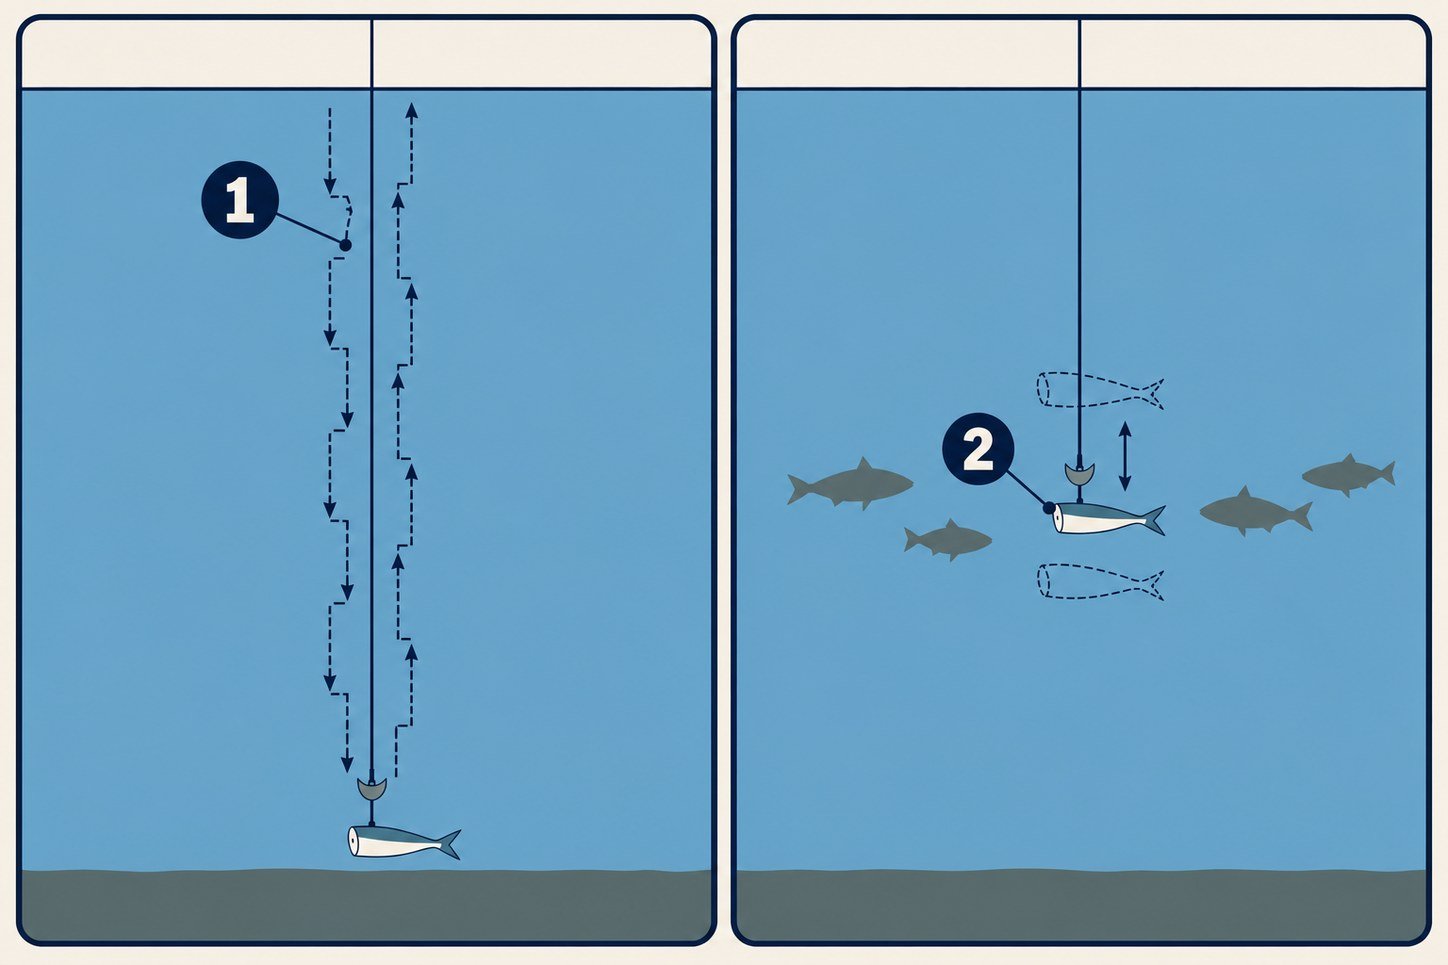
- 1. Stair-step: down 10 ft, up 3–4 ft, repeat to the bottom, then work back up
- 2. Hold one depth: raise and lower, or let the swell work it
Reading Tide and Structure
- Start with bait. Find herring or other baitfish schools before choosing a depth.
- Inspect points and drop-offs. Current meeting a steep point can gather bait and draw salmon and birds.
- Check rips for coho. These boundaries concentrate plankton and baitfish.
- Think about light for Chinook. Fish near kelp at dawn and dusk.
- Follow suspended marks. Bait and fish can appear away from the bottom.
- Reset deliberately. Retrieve, inspect the herring and reposition when the drift passes the useful water.
Worked Examples
These are plans, not catch reports. Each one starts with the WDFW check, then the bait, the drift and the spin.
Winter Blackmouth Near the Bottom
Rules change by Marine Area and in season. Check the current WDFW sport fishing regulations and emergency rules before every trip.
Find bait and marks on the sonar, set up the drift so it carries you over them and check the spin before the first drop.
In Marine Area 10 (Seattle/Bremerton), start with the winter blackmouth pattern: within 10 ft of bottom in 60–200 ft of water. Lower with control, then work upward with intermittent reeling and pauses.
Keep the line near 45 degrees and adjust weight or boat control as the drift changes. If the sonar shows suspended bait and marks, work that depth rather than forcing the bottom pattern.
A peck is a reason to keep reeling. If the line tightens and the rod loads, maintain pressure without a jerk.
Summer Chinook at Point No Point
Rules change by Marine Area and in season. Check the current WDFW sport fishing regulations and emergency rules before every trip.
Find bait and marks on the sonar, set up the drift so it carries you over them and check the spin before the first drop.
At Point No Point in Marine Area 9 (Admiralty Inlet), try near shore at first light in 20–120 ft of water. In open water, start at 40–80 ft. As light increases, inspect deeper marks.
Rig a green-label herring on a 4/0 lead hook and a 3/0 trailing hook. Keep the leader no heavier than the main line.
Work the marked depth rather than lowering through it without a pause. If a fish pecks at the bait, keep reeling until the line tightens and the rod bends under its weight.
Resident Coho in South Puget Sound
Rules change by Marine Area and in season. Check the current WDFW sport fishing regulations and emergency rules before every trip.
Find bait and marks on the sonar, set up the drift so it carries you over them and check the spin before the first drop.
For resident coho in winter or spring, try Tacoma Narrows or Fox Island in Marine Area 13 (South Puget Sound). Check rips and the upper 50 ft.
Smaller herring can use hooks in the 2/0–3/0 range. Match the actual bait, then test it. If a wider search is useful, motor mooching provides the faster near-surface presentation described for coho at rips.
Watch the bait after changing speed. If the line goes slack during a bite, reel faster to recover contact. Keep reeling as the rod loads.
A Line That Goes Straight Down on a Big Tide
Rules change by Marine Area and in season. Check the current WDFW sport fishing regulations and emergency rules before every trip.
Find bait and marks on the sonar, set up the drift so it carries you over them and check the spin before the first drop.
If the line becomes nearly vertical, retrieve and inspect for a wrapped leader. Check the weight and boat movement before you send the bait down again.
In fast current, a heavier sinker or backing into the current can help restore the angle. Keep the heavier weight within the rod's rating. When current slows, a lighter sinker or moving forward in spurts may be the useful adjustment.
Return to the marked depth with a controlled descent. On a bite, reel to regain tension and keep pressure as the rod loads.
Blackmouth at Sekiu When the Bait Shows
Rules change by Marine Area and in season. Check the current WDFW sport fishing regulations and emergency rules before every trip.
Find bait and marks on the sonar, set up the drift so it carries you over them and check the spin before the first drop.
For winter blackmouth at Sekiu in Marine Area 5 (Sekiu/Pillar Point), plan around the weather and whether herring and sand lance are around. WDFW lists launches at the Sekiu and Clallam Bay marinas.
Fish near the bottom where the sonar shows bait or fish. Lower steadily, then work up with pauses. If there's no bait, move rather than repeat an empty drift.
A charter captain advises reeling through a subtle bite. Let the line tighten and the rod load, then maintain steady pressure.
The Bite, Hook Set, Fight and Landing
A salmon may swipe at the herring before taking it. That is why a light peck should not trigger a sharp hook set.
Watch for:
- A peck or tap: Keep reeling so the fish can chase and eat.
- Slack line: Reel faster to recover contact.
- Growing weight: Keep reeling until the line tightens and the rod loads.
- A loaded rod: Maintain pressure without a jerk.
Loading means the rod bends under a sustained pull. Don't add a hard sweep. Keep reeling and keep steady contact.
Bite to Hook-Up
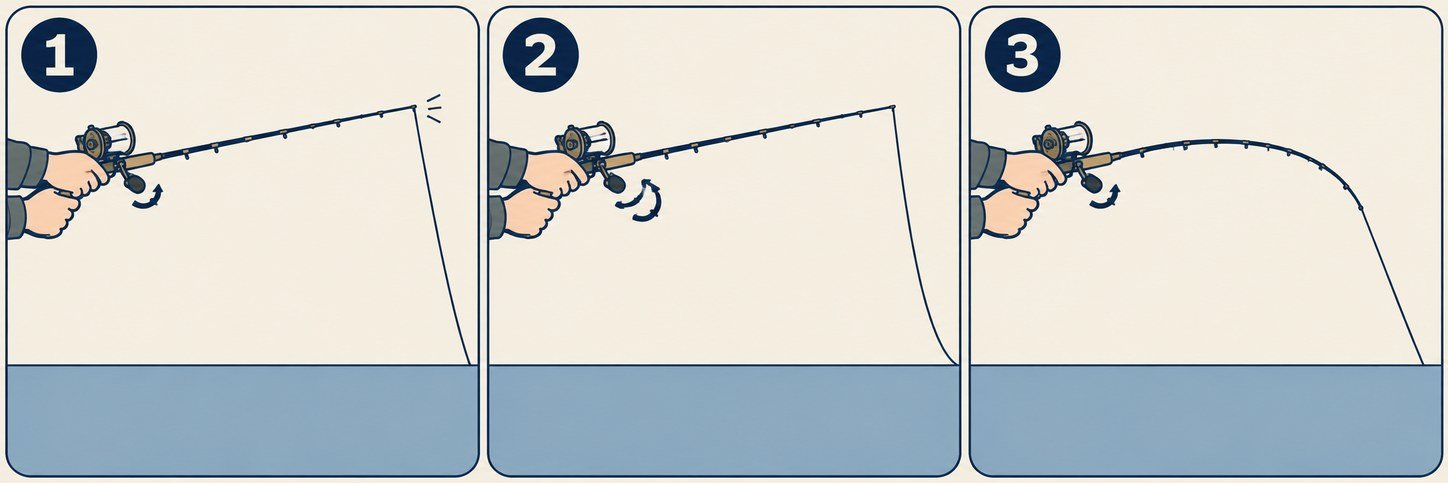
- 1. Peck: keep reeling
- 2. Slack line: reel faster
- 3. Rod loads: keep reeling, don't yank
During the fight, keep a steady bend and let the drag release line under pressure. Avoid sudden slack. Tell others aboard that you have a fish so they can clear space and loose tackle.
Plan the netting position before the fish reaches the boat. A long leader creates more distance between the sinker and fish. Avoid pulling the sinker into the rod tip or trying to lift the fish with the rod.
Bring the fish within reach under control. Let the net handler receive it rather than chasing it with repeated swipes. Have the release tools ready before handling begins.
Handling and Release
Check WDFW's rules on keeping, releasing and handling fish before you go. That includes whether a released fish may be brought aboard. Don't use this page's handling advice as an answer to that rule.
NOAA Fisheries recommends wet hands, minimal air time and a rubber net. Keep the fish partly submerged while handling it. Use a hook remover and avoid holding it by the gills.
Support the fish without squeezing. If a hook is deep, cut the leader rather than digging for it. Keep cutters within reach so you can keep a hand under the fish.
Allow the fish to recover before release. These are care practices, not a statement about which fish may be retained or released. Check WDFW for the species and Marine Area.
Common Mistakes and Fixes
| Mistake | What You Notice | Fix |
|---|---|---|
| Poor bait spin | The herring wobbles or flops | Inspect the cut and hook placement, then test for a quick, tight spin. |
| Near-vertical line | The leader wraps around the main line | Adjust weight and boat movement toward a 45-degree angle. |
| Uncontrolled descent | Tangled leader or damaged bait | Feed line steadily and avoid a hard splash. |
| Jerking at a peck | Contact disappears | Keep reeling until the rod loads; don't yank. |
| Fishing without marks | Repeated drifts through empty-looking water | Locate bait and salmon before dropping. |
| Damaged herring | Torn body or bait that no longer rolls | Cut a fresh bait and test it. |
| Losing track of line out | You can't repeat the presentation | Count pulls or use a line counter. |
| Leader stronger than main line | The intended weak connection is lost | Choose a leader at or below the main-line test. |
| Weight beyond the rod's rating | The setup feels overloaded | Change the rod or reduce the load within its stated rating. |
A tangle is useful information. Retrieve carefully and look at where the leader crossed the main line. Then check descent and angle before changing the bait.
Do the same after a missed bite. Inspect the herring, recover the marked depth and return to controlled reeling. Avoid changing every part of the presentation at once.
Tips That Make the Difference
- Buy sound bait. Look for intact scales and no freezer burn or blood beneath the wrap.
- Brine whole, cut as needed. Prepare the herring overnight, then make each plug cut while fishing.
- Test every fresh bait. A quick, tight spin is the starting check.
- Use a hi-vis main line. Izorline sells Hi-Vis Yellow mono. You can see the line angle, but you still have to fix it.
- Repeat line out. Count pulls or note the counter reading when the presentation reaches useful marks.
- Plan around the tide. Check the predictions, then watch how the boat really drifts.
- Adjust for coho. Try a faster bait near a rip.
- Rinse afterward. WDFW advises rinsing gear with fresh water after a saltwater day.
Keep the next bait and spare leader organized. A rushed replacement can hide a weak connection or mismatched leader test. Check both before returning to the drift.
Brushing Up: Separate a depth change from an action change. Work the marked depth with a sound bait before deciding the retrieve needs to be faster.
When It's Slow
Begin with the bait beside the boat. Does it spin quickly and tightly? If it is damaged, cut a fresh one. A longer drift can't repair poor bait action.
Next, check contact. Near-vertical line calls for a weight or boat-control adjustment. Confirm that the bait is reaching the marks you intended to fish. Use the counter or counted pulls to repeat line out.
Then look at the water again. The bait school may be suspended, spread out or absent from the next pass. Reposition instead of assuming the first drift line remains useful.
For coho, consider smaller herring and a faster presentation. For Chinook, WDFW names blue- or purple-pack bait. Match hooks to the actual herring and check the roll again.
If salmon are scattered, motor mooching or trolling can cover more ground. Jigging offers another drift presentation when fish remain concentrated. For separate approaches, read Spoons and Spinners or Pulling Plugs.
Safety
The boat operator needs attention and room to work, most of all when you reset a drift. Agree on who runs the boat and who handles the net.
- Life jackets: Wear a life jacket that fits. Washington State Parks says to carry a properly fitted U.S. Coast Guard-approved life jacket for each person. Check its life-jacket guidance for the children's and throwable rules.
- Boater education: Check Washington State Parks' boater education rules, especially if you run a motor.
- Cold water: Many Washington waters stay under 60°F most of the year. Cold water shock is a risk even when the air feels warm. Read Washington State Parks' cold-water guidance. Wear waterproof layers and carry dry clothing.
- Weather and tide: Check the NWS Seattle forecast office marine forecast and NOAA tide predictions before you leave. Wind or strong current can call for the motor and more lead. Change the plan when conditions change.
- Inside the boat: Keep the deck clear. Store the knife between bait cuts. Keep fingers away from the hooks when a salmon thrashes near the net.
Boat Safety Strip

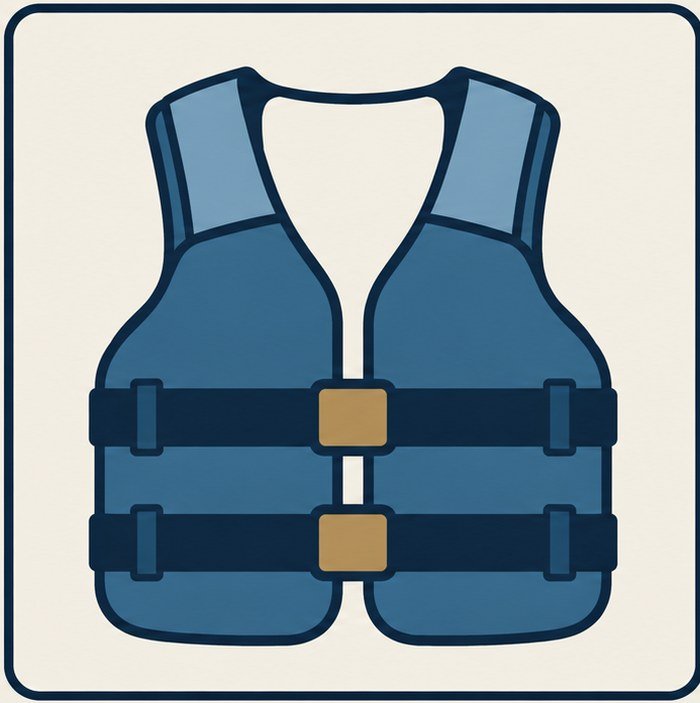 A life jacket for every person aboard.
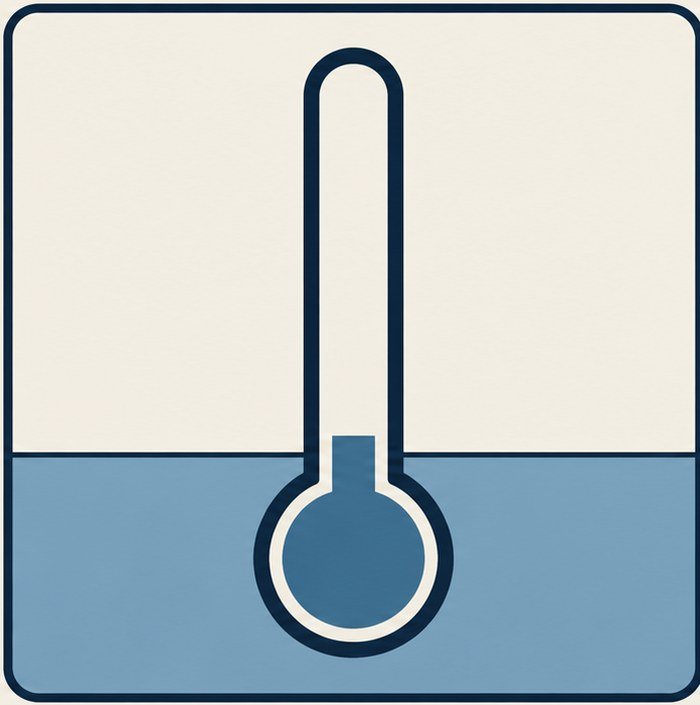 Cold water under 60°F most of the year
 Check the marine forecast and tides
- 1. A life jacket for every person aboard.
- 2. Cold water under 60°F most of the year
- 3. Check the marine forecast and tides
WDFW Rules to Check
Check the exact Marine Area and species before choosing the trip and tackle. A rig illustration shows a fishing arrangement, not permission to use it.
Check:
- Whether the Marine Area is open for salmon and which species are covered.
- Mark-selective rules and minimum sizes.
- Hook and barb rules and how many hooks a leader may carry.
- Rules on bringing released fish aboard and other handling rules.
- Catch-record cards and closed areas.
Rules change by Marine Area and in season. Check the current WDFW sport fishing regulations and emergency rules before every trip.
A Guided Day and What to Ask
A booked mooching day gives you a setting to learn the sequence: locate bait, test the herring, control the drop and respond to a bite. Confirm how the trip will run before booking.
Ask your guide to explain the reel controls before the first drop. Practice stopping the spool and recovering line while the bait is still close. Ask how the boat will be positioned and where you should stand during a drift.
Don't assume the trip will use the same method throughout. Ask whether the plan includes drift mooching, motor mooching or trolling. Confirm how much instruction you will receive in bait cutting and rigging.
Questions worth asking:
- Will we mooch, troll or use both methods?
- Will each angler hold a rod?
- How much help will I get with cutting and rigging herring?
- Which Marine Area will we fish?
- How will current WDFW rules shape the trip?
- What rods, bait and other equipment are included?
- Is fish cleaning included where relevant?
- What should I wear and bring?
- What is the weather cancellation policy?
- Who handles the net and release tools?
Ask your guide for their WDFW guide license number before you book.
Learn More
- WDFW Salmon Fishing in Marine Areas — boat methods, depths by species and how to mooch.
- WDFW Marine Areas — find your Marine Area and its page.
- WDFW Sport Fishing Regulations and Emergency Rules — check before every trip.
- NOAA Tides & Currents — tide predictions.
- NWS Seattle Forecast Office — marine forecasts for Puget Sound and the Strait.
- Washington State Parks Life Jackets and Cold-Water Safety — before a day afloat.
- NOAA Fisheries: Scaling Back Your Impact — catch-and-release tips (PDF).
- Spoons and Spinners, Pulling Plugs and Salmon — related methods and species.
Glossary
- Mooching
- Boat fishing with a weighted herring that spins as it rises and falls.
- Drift Mooching
- Working a herring from a drifting boat, usually with the motor off.
- Motor Mooching
- Slowly trolling a banana sinker and herring rig.
- Plug-Cut Herring
- Herring with its head cut off at two angles so it spins.
- Bevel
- A slanted cut.
- Herring Label
- Package color code that indicates bait size.
- Banana Sinker
- Curved mooching weight that takes the bait down.
- Barrel Swivel
- Small rotating connector that reduces line twist.
- Snap Swivel
- Swivel with a wire clip.
- Leader
- Line between the sinker and the hooks.
- Snell
- Knot that ties the leader along the hook shank.
- Mono
- Monofilament, a single strand of fishing line.
- Braid
- Line woven from fibers.
- Fluorocarbon
- Leader material that is harder for fish to see.
- Level-Wind
- Reel guide that moves across the spool to lay line evenly.
- Direct Drive
- Reel arrangement whose handle turns with the spool.
- Line Counter
- Reel feature that displays line out.
- Pulls
- Lengths of line drawn from the reel to the first rod guide.
- Drag
- The reel mechanism that releases line under pressure.
- Line Angle
- Angle of the main line between the rod tip and the water.
- Marks
- Fish shown on the sonar or fish finder screen.
- Stair-Step
- Repeated lowering and partial retrieval to work through the water column.
- Blackmouth
- Resident Chinook that stays in the Salish Sea.
- Resident Coho
- Coho that stays in the Salish Sea.
- Tide Rip
- Current boundary that can concentrate plankton and baitfish.
- Brine
- Salty soaking liquid used to firm bait.
- Marine Area
- WDFW's numbered saltwater fishing zone.
Guides Who Specialize in This
More Saltwater Methods
Explore Spoons and Spinners for a separate lure approach. Read Pulling Plugs for another boat presentation.
At a Glance
| Field | Summary |
|---|---|
| Main Species | Chinook, blackmouth and coho. |
| Water | Puget Sound and the Strait of Juan de Fuca by Marine Area. |
| In Short | Drift from a boat and work a spinning herring at the depth where bait and fish show. |
| Skill Level | Simple gear; bait action, boat control and the bite take years to master. |
| Best Times | Blackmouth: winter and early spring. Resident coho: winter and spring in Marine Area 13 (South Puget Sound) and early summer in Marine Area 10 (Seattle/Bremerton), when rules allow. Chinook: dawn and dusk. |
| Key Gear | Moderate, soft-tipped rod; level-wind, direct-drive or line-counter reel; mono main line; leader about 4–5 ft and no heavier than the main line; banana sinkers, snap swivel, bait-matched hooks and herring. |
| Example Line Pair | 15 lb main with 12–15 lb leader, or 20 lb main with 15 lb leader. |
| Depth Starting Points | Coho: top 50 ft. Open-water Chinook: 40–80 ft. Blackmouth: within 10 ft of bottom in 60–200 ft. Follow bait and marks. |
| Bite Response | Keep reeling until the rod loads, then maintain steady pressure without a jerk. |
| Before Leaving | Check WDFW rules, marine weather and tide predictions. |
On This Page
- What It Is and When It Beats Other Methods
- Target Species and Where in Washington
- Marine Area by Marine Area
- Seasons and Conditions
- Rods, Reels, Line and Leader
- Terminal Tackle and Rigging, Step by Step
- By Species
- Technique, Step by Step
- Worked Examples
- The Bite, Hook Set, Fight and Landing
- Handling and Release
- Common Mistakes and Fixes
- Tips That Make the Difference
- When It's Slow
- Safety
- WDFW Rules to Check
- A Guided Day and What to Ask
- Learn More
- Glossary
- Guides Who Specialize in This
- More Saltwater Methods